Showing posts with label recipe. Show all posts

Tuesday, April 21, 2009

Vanilla Pudding with Orange

When you get sick of cookies, there's a whole other world of desserts to choose from. Sometimes I forget that, but I have the good fortune of having friends around to remind me that I should make all sorts of other things for them to eat. This vanilla pudding was suggested by my friend Jen while in town for the weekend, and I had just bought a ton of particularly delicious oranges, so I figured, what the heck?

You can skip the orange juice & zest and leave the pudding at its more simple but equally delightful vanilla state, or replace the orange with lemon or lime or raspberries or [insert name of 20 more fruits here]. It's a nice base to work with. The citrus changes its texture a little, on the custardy side.

Vanilla Pudding with Orange

2 cups milk
1/2 cup granulated sugar
3 tablespoons cornstarch
1/4 teaspoon salt
1 teaspoon vanilla
1 tablespoon butter
2 tablespoons orange juice
1 tsp orange zest

Make room in the fridge.
Heat the milk in a sauce pan over medium heat until bubbles form at the edges.
In a medium bowl, combine the sugar, cornstarch and salt. Pour the dry mixture into the hot milk, a little at a time, stirring to dissolve. Add the zest and continue to cook and stir until mixture thickens enough to coat the back of a metal spoon. Do not boil. Remove from heat, stir in vanilla, butter, and orange juice. Pour into serving dishes. Chill before serving.
Sprinkle with ground clove for garnish if desired.

Friday, April 17, 2009

Thyme Tuna Melt

If I had to pick one thing as my favorite lunch food, it would have to be a tuna melt. I make more variations of them than I've ever bothered to count, but perhaps now that I am blogging many of my meals we'll see just how creative I can get with a can of fish and some bread. It doesn't sound very appetizing when I put it that way, does it? Well, try this next time you find yourself hungry for something diner-y and you might be in for a surprise.

It's worth mentioning that garlic and onion (as opposed to sour cream and onion) chips are extra super delicious with this. The oranges go well, too, especially if you add a pint of Blue Moon. I do love having a beer with fish lunches.

Thyme Tuna Melt


1 8-oz can tuna, drained
1 1/2 to 2 tbsp mayonnaise
a pinch of kosher salt
2 pinches of freshly ground black pepper
1 tbsp fresh thyme leaves (about 5 branches worth)
2 slices whole wheat bread
2 to 4 tbsp butter
2 slices monterey jack

Heat 1 or 2 tbsp of butter in a skillet on medium-high heat.
Combine the tuna, mayo, salt, pepper, and 1/3 of the thyme in a bowl.
Once the butter is melted and a little bubbly, sprinkle 1/3 of the thyme into it and set the slices of bread on top. Give them a minute or two to get toasty, and flip them over, adding butter and the last of the thyme to the pan before the bread goes back down. Immediately lay down the monterey jack and pile the tuna on in an even layer. Cover the skillet and turn down the heat to medium, until the cheese has made considerable progress toward melting. Uncover and put the faces of the sandwich together. Sprinkle with more thyme if desired.

Wednesday, April 15, 2009

Coconut Cookies, With or Without Dark Chocolate


Both of these cookies are from the same dough. After I baked the first dozen, I added a cup of dark chocolate chips and spooned lumpy globs onto the cookie sheet. They look and taste very different, but they're rich and sweet and the kind of chewy only coconut can produce.

For extra glam, dip the cookies in shredded coconut before placing on the cookie sheet.

Coconut Cookies
1 cup butter, melted and cooled to room temperature
1 cup sugar
1 tbsp vanilla
1 tsp coconut extract
1 egg + 1 egg yolk
2 cups flour
1/2 tsp baking powder
1/2 tsp cinnamon
1/4 tsp salt
1 cup shredded coconut
3/4 to 1 cup dark chocolate chips (optional)

Preheat the oven to 375º.
In a medium bowl, whisk the flour, baking powder, cinnamon, salt, and shredded coconut. Set aside.
In a large bowl, mix the butter and sugar with a wooden spoon. Stir in the vanilla, coconut extract, egg and egg yolk. Add the dry ingredients and stir until just combined. Add the chocolate chips if desired.

Drop in heaping teaspoonfuls two inches apart on a greased cookie sheet. Bake 8 to 12 minutes or until lightly golden around the edges. They will be chewier if you under-bake them a little, which I personally prefer.

Tuesday, April 14, 2009

Butterscotch Macadamia & Cashew Cookies


I confess! I didn't bake the cookies in the photo, nor did I take the photo. My friend Matt baked
this batch, with my recipe, and I'm pretty sure his lovely wife Brooke took the photo. They are big big fans of these cookies - Matt claims to have made variations of them 4 times recently. I believe him, and you will too once you've tried them. Yeah, I'm smug about it. They've gotten really good reviews.

These are really soft, really buttery and if you get nuts with salt on them there's a nice sweet-vs-salty kick. Walgreens has lightly salted mixed cashews & macadamias pretty cheap. I stock up when they're on sale. You can use just macadamias, or pecans, or walnuts, or no nuts at all, switch the chips to chocolate or white chocolate or peanut butter chips. Really, do anything you want as far as the add-ins go. The base of these cookies is really flavorful and I doubt there's anything you could throw in that wouldn't be good.

Butterscotch Macadamia & Cashew Cookies


1 cup butter at room temperature
3/4 cup brown sugar, packed
1/2 cup granulated sugar
1 egg + 1 egg yolk
1/2 tablespoon vanilla
2 1/4 cups all purpose flour
1 tsp baking soda
1/2 tsp salt
1 cup butterscotch chips
1 cup lightly chopped macadamias and cashews

Preheat the oven to 325º.
In a medium bowl, whisk together the flour, baking soda, and salt. Set aside.
In a large bowl, beat the butter with a hand mixer until creamy. Beat in the brown sugar, scrape down the bowl with a spatula, then beat in the granulated sugar until fluffy. Add the egg, beat it in, then beat in the yolk. Scrape down the bowl, add the vanilla, and beat again.
Add the flour and stir it in with a wooden spoon. Add the butterscotch and nuts, and stir just until evenly distributed.

Roll teaspoonfulls of dough into rough balls and place them 2" apart on a cookie sheet. Bake in the upper middle of the oven for 10-12 minutes or until browned around the edges. They will continue to bake after they are removed from the oven, so don't overbake them. Somewhat chewy centers are the key.

Sunday, March 1, 2009

Cream Puffs with Mascarpone and Ricotta


Most cream puffs are made with a French pastry cream, but I'm a cheese lover. Also, I had a bunch of leftover ricotta from making pizza the other day, and wanted to make a fancy dessert for a potluck we hosted Saturday night. It took me two solid days to decide between cream puffs or cannoli, but I didn't have a cannoli form nor did I feel like going out in the cold to get one.

I strongly recommend that you cut or poke a hole in them to let the steam out as soon as possible when they come out of the oven, or they will deflate. These deflated, but they were still delightful. If you don't have an icing bag, you can put the dough in a plastic baggie and cut off one corner so that it's about a 1/2" opening.

Cream Puffs
1/2 cup water
1/2 cup milk
7 tbsp butter
1/2 tsp salt
1 tsp sugar
1 1/4 cup all purpose flour
1/2 tsp baking powder
4 eggs


Preheat the oven to 400ºF. Line two cookie sheets with parchment paper.
Combine water, milk, butter, salt, and sugar in a small sauce pot and bring to a boil. Take it off the heat, add flour and baking powder, return to heat, and mix quickly. Lower the heat and mix for one minute. Transfer to a bowl and add two eggs. Mix with a hand mixer until incorporated, then add the other two eggs one at a time and continue mixing until the dough is silky and smooth. Put the dough into an icing bag and squeeze it out into golfball-sized globs about 1.5" apart on the cookie sheets. Bake one pan at a time in the middle of the oven about 20 minutes or until golden. Remove from the oven and immediately pierce them to let steam out.

Cheese Cream Filling:
1 cup whole milk ricotta cheese
1/3 cup mascarpone cheese
1/2 to 3/4 cup powdered sugar

Mix the cheeses and 1/2 cup of powdered sugar in a small bowl. Add extra powdered sugar as needed to thicken it, then set in the fridge while the puffs cool.

Once the puffs are cool and cut in half, put a heaping teaspoon of cream inside. Dust with powdered sugar. Chill until ready to serve .

Venison Chili

You can, of course, make chili that's quite delicious out of beef, but I happened to have a freezer full of venison. This is what happens when you're close to someone whose dad hunts. Anyway, chili takes very little work, all things considered. Once you've browned the meat and brought everything to a boil, the only work left to do is to stir occasionally and let it sit for an hour or two. One batch of this lasts us about a week, having it every night for dinner and a few lunches...though honestly I get sick of it and freeze a bunch after a few days. Which isn't to say it isn't lovely when I've taken a break from eating it every day!

Leftovers only get better when it comes to chili, and if you add a little extra water and some hot sauce, this can be made into a pretty serious chip dip for parties.


Venison Chili
2 tbsp corn oil
2 medium onions, chopped
1 medium red bell pepper, cut into ½” cubes
6 to 10 cloves of garlic, minced
¼ cup chili powder
1 tbsp ground cumin
2 tsp ground coriander
1 tsp red pepper flakes
1 tsp dried oregano
½ tsp cayenne pepper
1 ½ pounds ground lean venison (or beef)
1 15-oz can dark red kidney beans
1 15-oz can black beans
1 28-oz can diced tomatoes
1 28-oz can tomato puree
salt to taste
shredded cheese & sour cream to garnish

Heat the oil in a large soup pot over medium heat until simmering but not smoking. Add the onions, bell pepper, garlic, chili powder, cumin, coriander, pepper flakes, oregano, and cayenne. Stir occasionally with a wooden spoon until the vegetables are softened and lightly browned, about ten minutes.
Turn the heat up to medium-high and add half the venison. Break it up with the spoon and continue to stir occasionally until the meat is no longer pink. Add the beans, tomatoes, tomato puree, and half a teaspoon of salt. Bring it to a boil, then reduce the heat to low and simmer, covered, for an hour or so, stirring occasionally to make sure the bottom's not sticking. Uncover the pot and simmer another hour, still stirring occasionally, adding around 1/2 cup of water at some point. Serve with shredded cheese and sour cream, or dip tortilla chips in it.

Sunday, January 25, 2009

Sweet Potato Fries


Sweet potato fries are one of the best simple foods around, if you ask me. That salty crispy exterior that holds in all the sweet melt-in-your-mouth goodness inside. Man, I just had these for dinner last night but I already want some more!


Sweet Potato Fries
Serves 3, prep time 30 minutes plus hour of freezing time

2 large sweet potatoes
1 tbsp corn starch
1 tbsp salt
1 tbsp paprika
1 tsp brown sugar
several cups of vegetable or canola oil for frying

Cut the sweet potatoes into fries. I always start this by cutting them in half to give myself a nice flat edge to sit them on while I cut them up. Put the cut fries into a large bowl, and put them in the freezer for at least one hour.
Heat your oil in a deep pot or turn on the fryer, if you have one. Lay out some paper towels on a pizza pan or big plate to drain the fries on. Mix the salt, paprika, and brown sugar in a small bowl. Sprinkle the tablespoon of corn starch over the fries and make sure they are all thinly coated. This is what gives them crispy exteriors.
When the oil is very hot, add the fries. A two-hand handful is about the right amount to fry at one time, for most pans. If there are so many fries in the oil that some are not submerged, it's too many. Fry each batch until browned around the edges. Remove them to the paper towels and sprinkle with the seasoning mix.
Once all the fries are done, shuffle them with your hands so that the hot ones and the not-so-hot ones are evenly distributed and everything gets plenty of seasoning.

I strongly recommend dipping these in ranch dressing, and/or serving them with turkey burgers. I'll post that recipe for you tomorrow.

Saturday, January 24, 2009

Classic Pancakes

This pancake recipe is brought to you by my grandma's 1951 edition of the Better Homes and Gardens cookbook, and the phone call I got a few days ago from a good friend who was interested in making pancakes from scratch. Figures she'd call me - I've got a strict No Boxed Mixes rule, so of course I have a tried-and-true pancake recipe handy. I have made some adjustments from the original recipe, because a) for some reason the amount of milk called for in that cookbook leaves you with thick almost doughy batter that never cooks all the way through, and b) I can't ever leave a recipe how I found it.

Pancakes
1 1/4 cups all-purpose flour
1/2 tsp salt
1 tbsp baking powder
1 tbsp sugar
1 egg
1 cup + 2 or 3 tbsps whole milk
2 tb vegetable oil or melted butter
1 tsp butter for the skillet

In a medium bowl, whisk together the flour, salt, baking powder, and sugar.
In a small bowl, whisk together the egg, milk, and oil.
Pour the wet ingredients into the dry and mix until just combined. Batter should be slightly lumpy.
Heat your skillet over medium/high heat and add the tsp of butter. When this butter is bubbly, you're ready to go.
Using a 1/3 cup measuring cup, pour one pancake in the middle of the skillet. How this one cooks will determine whether you need to add more milk or not. If it doesn't spread out sideways, or if the bubbles don't show up for several minutes, you need more milk to thin it out. If it cooks too fast, turn your heat down a little.

Once you know your batter's the right consistency, you can put one or two pancakes onto the skillet at a time. They will be about 5" or 6" so leave room for them to spread. When the pancake has bubbles all over the top, it's time to flip it. Each side should only take 2 or 3 minutes.

Wednesday, January 21, 2009

Unbelievable Chocolate Chip Cookies

Ok, so, chocolate cookies are totally basic and classic and wonderful. A friend of mine said that they're simple compared to the things I make most of the time (like peanut butter cake and chocolate cherry rum fudge), which might explain why I don't make them very often. The truth is, I don't make them very often because every time I do the batch lasts only a few hours and everyone in the house grumbles about having eaten too many. Maybe it's because there's something special about chocolate chip cookies that is so very satisfying in the way that hugs from your favorite family members are satisfying. You know?

I have experimented with chocolate chip cookie recipes for the past few years and this recipe is the result of that experimentation. It has double the vanilla and a little more salt than most recipes. The double vanilla is just because I love it so much, and the salt counteracts it and brings some savory into the picture to accompany the walnuts. I have faith that these will become your favorite chocolate chip cookies the first time you try them, but I would love to try any recipes you might want to email me as a challenge.


Decadent Chocolate Chip Cookies

2 slightly-overfull cups all purpose flour
1/2 tsp baking soda
3/4 tsp salt
1/4 tsp cream of tartar (optional, it makes them good though)
1 1/2 sticks butter, melted and cooled to warm
1 cup packed brown sugar
1/2 cup white sugar
1 large egg + 1 egg yolk
2 tsp vanilla
1 3/4 cups chocolate chips
1/4 cup chopped walnuts

1) Preheat the oven to 325º with racks in the middle and upper-middle positions.
2) Whisk the flour, baking soda, and salt in a small bowl and set aside.
3) Mix the butter and sugars in a medium bowl. Add the vanilla and eggs and beat until just combined.
4) Add the wet ingredients to the bowl of flour and beat until just combined. Stir in the chocolate chips and nuts.
5) Drop lumpy tablespoonfuls on a cookie sheet, at least 2" apart. Bake for 15 to 18 minutes or until golden brown around the edges.

Tuesday, January 20, 2009

Baguettes & Boules


For sandwiches, crostini, to spread with jam or cheese, there is nothing better than freshly baked French bread. Italian bread is nice, too, but as with most things I like the French version better.

Baguettes

1 package (2 1/4 teaspoons) active dry yeast
1 teaspoon sugar
1/4 cup warm water
3 1/4 cups unbleached all-purpose flour
1 teaspoon salt
3/4 cup plus 2 tablespoons cold water
Oil for bread pan

1. In a small bowl, dissolve the yeast and sugar in the warm water. Let sit for 2 to 5 minutes, or until foamy and showing signs of life.
2. Combine flour and salt in a very large bowl using a pastry cutter, then add the yeast mixture and stir.
3. While still stirring, have a helper add the cold water in a steady thin stream and continue stirring until the mixture becomes dough, about a minute. If you have no helper, you can just pour a bit at a time and stir it in before adding more.
4. Knead the dough either on the counter or in the bowl for a few minutes, until the dough is smooth and soft. If it is hard to knead, dip your fingers in cold water and proceed with kneading (repeat as needed) until the dough is softened. If the dough is too wet, add a little flour to the kneading surface.
5. Form the dough into a ball and flatten it to a fat disc, then place it in the bottom of the mixing bowl. You should grease the mixing bowl slightly and get some of the oil on all sides of the dough. Cover with plastic wrap or a towel and let rise in a warm place until doubled, 1 1/2 to 2 hours. I usually set the bowl over the warm part of the stove where the pilot heat exhaust is. Sitting it near the radiator also works.
6. Punch down the dough and knead it for about 30 seconds to get some of the air bubbles out.
**If you want to, you can repeat steps 5 and 6 two or three times for varying levels of bread softness. I usually only punch it down once or twice.**
7. Cut or tear the dough into 2 parts and set one aside under plastic wrap or a towel so it doesn't dry while you work the first loaf. Flatten the dough into a large rectangle using your hands, pressing out air bubbles as you go, and fold the dough over itself in thirds (like a letter) lengthwise. Fold the ends underneath and pinch them well to secure them on the underside of the loaf. It should look like a baguette about now. You can make the loaf longer and thinner by rolling it with your hands if you want to. Place on a lightly greased baking sheet, cover, and repeat with the other half of the dough. Cover both loaves and let rise by half, about 30 minutes. Preheat the oven to 450, then cut 1/2" deep diagonal slashes down the top of the loaves . Cover and let rise while the oven heats. Bake 20-25 minutes, and throw in 2 or 3 ice cubes after 15 minutes to improve the crust texture. They'll make a nice sizzling sound, but it won't hurt you I promise.


For a Boule
Starting at the end of step 6, Form the whole piece of dough into the smoothest ball you can by making a thick square and tucking the corners underneath, pinching them into the underside dough to hold them there. Place patched side down on a *lightly* greased baking sheet. Cover with a bowl or pot and let rise to double or triple its original size. Once it is huge, turn on the oven to 425 and cut a few deep slashes in the top with a serrated bread knife, cover and let rise a bit more while the oven heats. Bake for 25 to 30 minutes, tossing ice cubes into the oven after 15 minutes.

This bread is really great with peanut butter and blueberry preserves.

Monday, January 19, 2009

Fish & Chips! or, Beer-Battered Tilapia on toasted Brioche

For those of us who don't have access to a nice local pub, I bring you good ol' fried fish and chips.
I like to serve fried fish on a toasted bun, with tomato and mayo and a little hot sauce (we use Marie Sharp's,
which we discovered and purchased in Belize last year. You can buy it online, it's worth it!) and, of
course, fries doused in salt and vinegar with a pint of beer on the side. The pickle is optional.

If you don't have a deep fryer, you can use a deep skillet or a wok or a large sauce pot. Just fill it at least 2" deep with oil and use a pair of tongs or a Chinese skimmer to get the food out. If you want to skip the bun, use 2 fillets and serve them whole.

Fish & Chips
Serves 2. Prep time about 1 hour, plus 1 hour of letting the fries freeze beforehand.


2 potatoes
1 fillet of tilapia (or cod, or flounder, or catfish)
1/4 cup beer
1 egg
1/4 tsp salt
1/4 cup milk
1/4 cup flour
1/8 tsp onion powder
1/8 tsp garlic powder
dash of chili powder
dash of black pepper
vegetable oil for frying
flour for dusting the fish
2 tbsp corn starch

Cut the potatoes into fries of whatever thickness you like best. I make them fat at one end and skinny at the other, though it's usually because my knife needs sharpening. There's nothing wrong with oddly shaped fries. Put the fries in a large bowl and rinse under cold water until the water runs clear. Now drain the water and lay the fries out over paper towels on a cookie sheet to dry them as much as possible. If they're still wet you'll get a lot of spattering when you fry them, and spattering HURTS. Put them in the freezer for an hour.

After abour 40 minutes of freezer time, start heating the oil over high heat and get your fish ready. In a shallow bowl, whisk together the milk, flour, beer, egg, and spices. The consistency should be similar to pancake batter but runnier. Add more flour or beer accordingly and stir well. Set aside.

Get the fries out of the freezer and dust them well with the corn starch. Fry them in large handfuls, but remember that the more fries are in the oil at a time the longer they take to cook. As each batch reaches the brown-and-crispy-edges stage, remove them and set them on paper towels to drain. They might get cold while you cook the fish, but you can re-fry some of them and mix them back in with the rest of the batch and they'll warm up.

Cut the fillet into 2 pieces. Drag each piece through some flour on a plate and then dip into the batter, then carefully drop into the oil. Flip occasionally, and remove from the oil when the batter has browned, and drain on paper towels before serving.

Don't forget to sprinkle salt and vinegar on the fries!

Thursday, January 15, 2009

Pumpkin Spice Cupcakes with Ginger Cream Cheese Buttercream

In honor of my sister's birthday, I bring you a cupcake recipe I can't get enough of. I chose this one because of its cream cheese icing, which she can't get enough of.

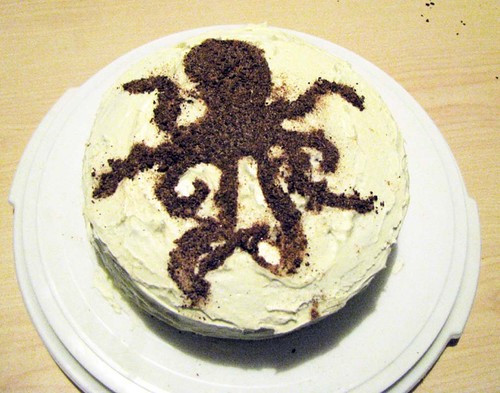
This recipe also works really well as a layer cake, which you can see here. For the layer cake I used 9" round pans (lined with wax paper for smooth tops!) and cut a stencil out of wax paper for the topping. You can make a stencil of whatever you want if you're handy with scissors or an xacto knife. You can even print a simplified image and cut it out from the printer paper, you don't even have to draw.

I recommend starting the icing while the cakes are in the oven. I also recommend getting the cream cheese and butter out of the fridge when you start making the cake, so they're nice and soft and you can actually blend them when you're ready to start the icing. I've killed a hand mixer or two trying to cream some cream cheese that was still far too cold. This bad-boy survives through just about anything, though. One of the best Christmas presents I ever got. Don't worry, your hand mixer will be fine as long as you take the time to let the cream cheese soften - and don't microwave it, either.

On to the recipe!
Pumpkin Spice Cake:

2 cups unbleached all purpose flour or cake flour*
2 tsp baking powder
1/2 tsp baking soda
1/2 tsp salt
1 tsp cinnamon (or more!)
1/2 tsp ground nutmeg
1/4 tsp ground cloves (or more!)
1/2 tsp ground ginger
1/2 cup butter at room temperature**
1 1/2 cups brown sugar, packed
2 large eggs
1/2 cup whole milk
1 cup solid pack pumpkin, NOT pumpkin pie filling.

Preheat the oven to 350º. Line muffin pans with cupcake cups, or just spray with nonstick if you are so inclined.
In a medium bowl, sift together the flour, baking soda, baking powder, salt, and spices. You can add extra cinnamon and clove up to double the amount listed, but more than that gets overpowering. I learned the hard way.
In a separate large bowl, cream the butter with a hand mixer until it's fluffy. Gradually add the brown sugar, then the eggs one at a time. Beat in the flour mixture alternately with milk, 1/3 of one then 1/3 of the other. Finally, beat in the pumpkin.
Pour into the cupcake cups (they should each be 2/3 full) and bake for 25 minutes or until a toothpick inserted in the middle of one comes out clean. Let cool completely before decorating.


Cream Cheese Ginger Buttercream Icing:
say that five times fast!

1 8-oz bar of cream cheese
6 tbsp butter, softened but still cool (see **)
1 tb sour cream
1/2 tsp ginger or more to taste***
1/2 tsp vanilla
1 1/4 cups confectioners' sugar

In a medium bowl, cream the butter, cream cheese, sour cream, ginger and vanilla with a hand mixer. Add the confectioners' sugar and mix until fully combined and smooth. Spread over cooled cupcakes in a circular motion, then dust the cupcakes with cinnamon and clove.


* I never bother with fancy flours, all purpose has its name for a reason.
** I find that microwaving a whole stick of butter for about 15 seconds gets it to the perfect temperature. For smaller amounts of butter, microwaves in 5 second intervals to see what works best with your microwave.
*** You can use freshly ground ginger, but the flavor will be much stronger, so put in a tiny bit at a time and taste test. Too much ginger and it'll get that nice tingly burn, which is not something most people look for in icing.

Wednesday, January 14, 2009

Sourdough For Starters

To start this blog, I bring you a hearty dense and delicious sourdough bread. Up to a week in the making and worth it, this bread is surprisingly simple as long as you remember sniff-test and feed your starter every day. This is a four-step process: 1) make a starter. 2) turn the starter into sponge. 3) turn the sponge into dough. 4) bake it.


1) To start your sourdough starter:


Mix 1 cup each flour and warm water in a plastic container, and stir them well. Put a lid on it, set it aside, and the next day open it, stir it, dump out half, and replace it with 1/2 cup each of fresh flour and warm water. Repeat until, after a few days (anywhere from 3 days to a week) it smells really sour and has gotten bubbly and frothy. On this day, do not pour any out, for you are ready to make bread!

2) Sponge!
Pour your starter into a large plastic or glass bowl and add 1 cup each of flour and warm water. Stir it well and set it in a warm place for several hours (6 to 12) to ferment. The longer it sits, the more sour the bread will be. When it is frothy and leaning toward pungent, it's ready. You can start your sponge in the morning and make the dough when you get home from work, or do it in the evening and let it ferment overnight.

3) Dough!
For the dough, you will need:
  • 2 cups sponge
  • 3 cups unbleached flour
  • 2 tablespoons olive oil
  • 4 teaspoons sugar
  • 2 teaspoons salt
Transfer 2 cups of sponge into a large bowl. Put the unused sponge back into your plastic container and put it in the fridge, with a hole in the lid to let all the air from fermentation out - if you don't poke a hole, the lid might pop off and make quite a mess. Trust me on this.

Add the olive oil, sugar, and salt to the 2 cups of sponge, mix well, then add the flour a cup at a time. As the dough solidifies, if you find it too dry or crumbly to form a proper dough, dip your hands in water and knead with wet hands. Once you've got the bread at a good consistency, set it aside in a warm place, covered, and let rise until doubled.

Once it has doubled, punch it down, knead it a little, form the loaf shape of your choice (I like a big boule, personally). Cut deep slits in the top and let it rise double again before baking.

4) Baking!
Turn on the oven when you put the bread in (do not preheat) and bake at 350º for 35 minutes or until the crust is golden.