Showing posts with label chocolate icing. Show all posts

Monday, November 16, 2009

The Wedding Cakes!


CONGRATULATIONS, MOM!!

My mom got married this weekend, and these are the cakes I made for the joyous occasion. I know some of you will be relieved that my cake-fest is over, but I have bad news for you: It's not. I have started selling batches of cupcakes, and am working on getting myself some business cards....so there will still be a lot of cake recipe testing to come. You'll just have to bear with me. Meanwhile, I have a new stepdad, and that's pretty cool.

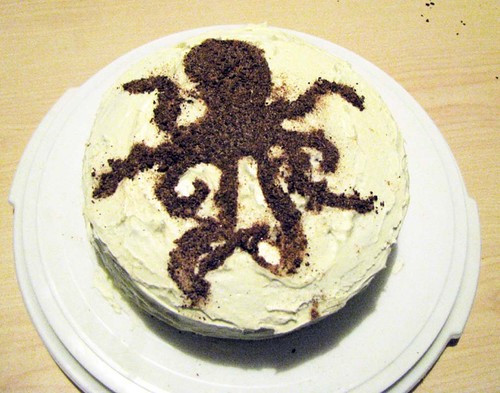
These cakes were my wedding present, and they are all cakes which have made appearances on this blog before because I worked on the recipes all summer in preparation. From top left: Carrot cake, Black Chocolate Cake, and Banana Cake with Nutella icing.


(who knew blueberries were so vivid green on the inside? I'd never noticed before!)


The chocolate cake was the most popular, and was the first to be polished off. The kids present didn't know what to make of a chocolate cake with blueberries & raspberries inside and on top, but there were a ton of tiny little Hershey's bars present so they were ok.

Chocolate Ganache
2/3 cup heavy (whipping) cream
6 oz semisweet baking chocolate, chopped
1 tbsp light corn syrup

Do not make ganache until you are ready to use it, like when you have assembled the cake and the base icing is smooth, or when your donuts are already fried and cooled, etc.

Bring the heavy cream to a boil in a small sauce pot. Remove from heat. Add the chocolate and corn syrup, let sit for a few minutes until chocolate is melting, then whisk until smooth. Pour over cake immediately. Smooth with an icing knife or whatever you can manage.


(sorry the photo's not more glamorous, we'd all had some really delicious white sangria by this point and I couldn't be bothered to mess with manual settings. ha!)

I added 2 layers of caramel cream to the banana cake, at the request of the groom. He approved of the result wholeheartedly. Good thing, too, cause I messed up the first batch of caramel cream so badly it was basically a weak dulce de leche. If I hadn't been so caked out, and if I hadn't had to travel with it, I would've held onto it to make tres leches cake or something. I'll just have to do it again on purpose sometime.

Caramel Cream
1 2/3 cup sugar
1 tablespoon water
3 3/4 cups whole milk
6 tbsp cornstarch
1/2 cup (1 stick) unsalted butter at room temperature
2 tsp vanilla

Measure out the cornstarch into a small bowl. Add 1 cup of the milk to it and whisk until smooth. Measure out the rest of the milk into another bowl. You will not have time to measure things once you have started.

Using a wooden spoon or heat-safe rubber spatula, stir the sugar and water in a small sauce pot over medium-high heat. Stir constantly until it looks like caramel. It will go through phases and will look like sand, gravel, rock candy, etc, and eventually will be liquid and dark brown. Let it get a tiny bit darker than you think it needs, because it will be paler when the milk is added. Do not, at any point, stop stirring. I mean it!
When it's nice and dark amber, remove from heat and add the whole milk (not the starch milk!) in a slow small stream while whisking constantly. Return to heat and add the starch milk while still whisking, a little faster now. When it thickens to a state just below, say, molasses, and has cooled a bit, add the butter and whisk until incorporated. Let cool almost completely before spreading it.

If using this caramel cream between layers of cakes, you will have a ton of leftover caramel, so you might want to bake a batch of brownies and swirl the caramel on top, or some cupcakes and inject it in them or something. Don't waste it!
Also, the cake will need to be refrigerated to let the caramel set before serving it.

Sunday, February 1, 2009

Chocolate Peppermint Cake

Ok, so this isn't the prettiest cake I've ever made, but the peppermint buttercream really needs to be refrigerated for an hour before trying to ice the cake, and the cake must be completely cool before you ice it. Otherwise your buttercream will do what mine did - sank right in. A last-minute addition of a whole batch of a completely different icing saved the day. Learn from my mistake! Chill! Or you'll have to take an extra hour to redo the icing, and it will not be fun, not at all.

I like to give birthday cakes as birthday presents. I generally ask my friends a week or so before their birthdays what they'd like, and I make whatever they ask for. I've made a 3-tier
neon-flecked cake, mango cheesecake, twin pies of chocolate mousse and key lime (served as two slivers, like TwoFace made cream pies), and last year I made two black forest cakes in the same week for two different birthdays. I think the best part of this setup is that I get fairly frequent challenges, and I put my best into them because, hey, they're my birthday gifts!

In the case of this particular cake, my friend Allie (ain't she cute?) said three words. Chocolate, peppermint, pattie. This is what I came up with. Unfortunately for you, it went over so well that it was eaten before I could get my camera and show you how soft and dark and rich the cake is inside. Please take my word for it, or better yet, prove it by baking this cake for yourself, it's intensely good. The recipe is derived from the back of the Hershey's Cocoa Powder container, but I traded out some of the cocoa for some dark chocolate and used butter instead of vegetable oil, changing the amount to account for the extra moisture in butter, and used strong coffee instead of water. I mean, come on Hershey's! Water? Really? Sheesh.
The peppermint icing recipe is borrowed from a Daring Bakers post, and it is heavenly.

Chocolate Cake
1 3/4 cups all purpose flour
2 cups sugar
2/3 cup cocoa powder
1 1/2 tsp baking powder
1 1/2 tsp baking soda
1 tsp salt
6 tbsp butter
2 1-oz squares unsweetened baking chocolate
2 eggs
2 tsp vanilla extract
1 cup boiling strong coffee

In a sauce pot on medium heat, melt the baking chocolate and butter, stirring often. If it starts to bubble, turn down the heat or it'll burn. Set aside and let cool.
Heat oven to 350º and grease two 9" round cake pans.
In a large bowl, whisk together the flour, sugar, cocoa powder, baking powder, baking soda, and salt. Add eggs, milk, buttery chocolate, and vanilla and beat with a hand mixer on medium for about 2 minutes. Scrape the sides of the bowl with a spatula, add the boiling coffee and stir it in. Pour into cake pans and bake for 30-35 minutes or until a toothpick inserted in the middle comes out clean. Let cool 10 minutes before removing from the pans and letting cool completely on wire racks.

Peppermint Buttercream Icing

1 cup granulated sugar
1/4 cup water
1 large egg
1 large egg yolk
14 tbsps unsalted butter, at room temperature cut into chunks (1 3/4 sticks)
8 drops of peppermint oil or 3 teaspoons of peppermint extract. Very different strengths!

Combine the sugar, and water in a small saucepan and warm over medium heat without stirring, until the syrup reaches 250 degrees F on a candy or instant-read thermometer then remove from heat.

While the syrup is heating, begin whisking the egg and egg yolk at high speed in the bowl of your mixer using the whisk attachment until pale and foamy.

When the sugar syrup reaches the correct temperature, reduce the mixer speed to low and begin slowly (very slowly) pouring the syrup down the side of the bowl being very careful not to splatter the syrup into the path of the whisk attachment. Some of the syrup will spin onto the sides of the bowl but don’t worry about this and don’t try to stir it into the mixture as it will harden!

Raise the speed to medium-high and continue beating until the eggs are thick and satiny and the mixture is cool to the touch (about 5 minutes or so).

With the mixer on medium speed, begin adding in a few chunks of butter at a time. When all the butter has been incorporated, raise the mixer speed to high and beat until the butter cream is thick and shiny. Finish with about 8 drops of the peppermint oil.

Refrigerate the butter cream until it’s firm but still spreadable. Put it back on the mixer and whisk until fluffy.

--------------------------------
Now, here's where MY cake went wrong. The icing was absorbed by the cake because I didn't wait for the involved parties to be the right temperatures, so here's the chocolate icing I made to cover up the bad job. It was delicious and worked like a charm. I may do the double-icing thing on purpose next time, cause it was really good with both.

Chocolate Icing
1/2 cup butter
2 cups powdered sugar
1 tbsp. vanilla extract
2 tbsp milk
1/4 cup cocoa powder
dash of salt
1 tsp peppermint extract (optional but recommended)

Melt butter or bring it to room temperature. Add powdered sugar, salt, vanilla, chocolate and milk. Whip with a whisk or an electric mixer until smooth. Refrigerate at least 30 minutes before icing your cake.

Thursday, January 15, 2009

Pumpkin Spice Cupcakes with Ginger Cream Cheese Buttercream

In honor of my sister's birthday, I bring you a cupcake recipe I can't get enough of. I chose this one because of its cream cheese icing, which she can't get enough of.

This recipe also works really well as a layer cake, which you can see here. For the layer cake I used 9" round pans (lined with wax paper for smooth tops!) and cut a stencil out of wax paper for the topping. You can make a stencil of whatever you want if you're handy with scissors or an xacto knife. You can even print a simplified image and cut it out from the printer paper, you don't even have to draw.

I recommend starting the icing while the cakes are in the oven. I also recommend getting the cream cheese and butter out of the fridge when you start making the cake, so they're nice and soft and you can actually blend them when you're ready to start the icing. I've killed a hand mixer or two trying to cream some cream cheese that was still far too cold. This bad-boy survives through just about anything, though. One of the best Christmas presents I ever got. Don't worry, your hand mixer will be fine as long as you take the time to let the cream cheese soften - and don't microwave it, either.

On to the recipe!
Pumpkin Spice Cake:

2 cups unbleached all purpose flour or cake flour*
2 tsp baking powder
1/2 tsp baking soda
1/2 tsp salt
1 tsp cinnamon (or more!)
1/2 tsp ground nutmeg
1/4 tsp ground cloves (or more!)
1/2 tsp ground ginger
1/2 cup butter at room temperature**
1 1/2 cups brown sugar, packed
2 large eggs
1/2 cup whole milk
1 cup solid pack pumpkin, NOT pumpkin pie filling.

Preheat the oven to 350º. Line muffin pans with cupcake cups, or just spray with nonstick if you are so inclined.
In a medium bowl, sift together the flour, baking soda, baking powder, salt, and spices. You can add extra cinnamon and clove up to double the amount listed, but more than that gets overpowering. I learned the hard way.
In a separate large bowl, cream the butter with a hand mixer until it's fluffy. Gradually add the brown sugar, then the eggs one at a time. Beat in the flour mixture alternately with milk, 1/3 of one then 1/3 of the other. Finally, beat in the pumpkin.
Pour into the cupcake cups (they should each be 2/3 full) and bake for 25 minutes or until a toothpick inserted in the middle of one comes out clean. Let cool completely before decorating.


Cream Cheese Ginger Buttercream Icing:
say that five times fast!

1 8-oz bar of cream cheese
6 tbsp butter, softened but still cool (see **)
1 tb sour cream
1/2 tsp ginger or more to taste***
1/2 tsp vanilla
1 1/4 cups confectioners' sugar

In a medium bowl, cream the butter, cream cheese, sour cream, ginger and vanilla with a hand mixer. Add the confectioners' sugar and mix until fully combined and smooth. Spread over cooled cupcakes in a circular motion, then dust the cupcakes with cinnamon and clove.


* I never bother with fancy flours, all purpose has its name for a reason.
** I find that microwaving a whole stick of butter for about 15 seconds gets it to the perfect temperature. For smaller amounts of butter, microwaves in 5 second intervals to see what works best with your microwave.
*** You can use freshly ground ginger, but the flavor will be much stronger, so put in a tiny bit at a time and taste test. Too much ginger and it'll get that nice tingly burn, which is not something most people look for in icing.