Thursday, February 26, 2009

Pizza

Making pizza dough takes about 10 minutes, plus the 2 hours of rising time, and another 15 minutes to arrange the toppings on them. This recipe makes enough dough for 3 round pies, or two deep dish or rectangular pies. Or you can impress your friends with a buffet of 6" pizzas with topping themes.

Sometimes when I can't decide on any one thing for dinner, I make a batch of pizza dough and go to the grocery store while it rises. I get meats, cheeses, and vegetables that catch my eye with no clear plan in mind, only deciding what goes together as it gets placed on the pies. I use either my tomato sauce or well-blotted finely diced tomatoes and all the cheese I can find, usually a mixture of parmesan, romano, asiago, goat cheese, ricotta, and fresh mozzarella. Yes, I said "and."

Pizza Crust

½ cup water (the hottest from your tap)
2 ¼ tsp active dry yeast
1 ¼ cups warm water
2 tbsp extra virgin olive oil
4 cups all purpose or bread flour
1 ½ tsp salt
olive oil for the bowl


1. Sprinkle the yeast over the warm water in a small bowl, stir and let stand about 5 minutes until it looks foamy. Stir in the rest of the water and the olive oil.
2. In a large bowl, stir the flour and salt with a pastry cutter or whisk. Pour in a little of the yeast mixture, stir it in, and repeat until they are combined and start to form dough.
3. Either in the bowl or on a counter top, knead the dough by hand until it is smooth and cohesive, this should take a minute or two tops. If the dough is too stiff or dry to become smooth, dip your fingers in water and knead until it cooperates.
4. Form the dough into a ball. Oil the inside of the mixing bowl and place the dough ball in it, cover tightly with plastic wrap and set it in a warm place until it doubles in size, 1 ½ to 2 hours.
5. Once the dough has risen, remove the plastic wrap and preheat the oven to 475º.
6. Separate the dough into 3 pieces, roll each into a smooth ball then flatten to a disc. Each of these is enough for one standard pizza crust, but you can adjust the amount of dough used if you want to make thicker or thinner crusts.
7. Cover two of the discs with a cloth while you work with the third. Working from the center of the disc, press down with the heel of your hand, turning the disc a little at a time so that you are working it in a circular motion as you press. Occasionally flip the dough over and press the other side. Sprinkle a little flour on the counter if the dough is sticking. If you are feeling confident, try tossing it in the air with a flick of your wrist to make it spin. Continue to press the dough in an outward circle until it is the size of your pan.
8. Place the dough on a lightly greased pizza pan or cookie sheet. Press it into the pan, again working from the middle to the outside so there is excess around the edges to create a crust.
9. Set aside the crusts while you prepare your toppings: chop the veggies, slice the tomatoes, sautée the sausage, mince the garlic. If using mushrooms I strongly recommend sautéeing them in advance not only to add flavor but to reduce the liquid in them, otherwise you end up with pools of water between the mushrooms and cheese, sometime even a soggy crust underneath; which is neither pretty nor very tasty.
10. The crusts will have risen a little, you can press them back down before adding toppings if you’d like, or prick the bottoms with a fork to prevent bubbles from forming in the crust while baking. Personally, I like the bubbles.
11. Add tomato sauce, Italian herbs, cheese, meats and veggies of your choice. Brush olive oil around the edges of the crust. Bake for 8 to 12 minutes or until crust is turning golden brown around the edges.

Thursday, February 19, 2009

Homemade Tomato Sauce


Jar sauces always have things in them I don't like. It's so disappointing to make a nice plate of tortellini and pass off your dinner to your roommates because you hate the sauce you poured on it. So, so sad. So I don't buy jar sauce anymore, which is no surprise to anyone who has eaten even one meal around me.

Making your own sauce is really easy, moreso if you have a blender. If you don't have a blender, substitute the diced tomatoes with tomato sauce (the plain kind), and chop your onions etc fine enough to suit your taste. I prefer less chopping and throwing everything in the blender later on, but that might have a lot to do with how funny my cats are when the blender scares them.

Tomato Sauce
1/2 medium onion, chopped
5 cloves garlic chopped
1/2 tbsp butter
1 tbsp olive oil
1/4 tsp salt
1/2 tsp parsley
1/2 tsp basil
1/2 tsp oregano
2 tsp rosemary
2 tbsp red wine
28-oz can diced tomatoes

In a sauce pot, simmer the garlic and onion in butter and olive oil until softened and the onions are clear. Add the tomatoes and spices and stir well, then simmer over medium heat for 15 minutes or so. Add more spices as desired. Put the sauce in a blender and give it a few pulses until the tomatoes are pureed to a thickness you prefer. Pour back into the sauce pot and add the red wine, and simmer a little while longer.

Wednesday, February 18, 2009

Ciabatta


This was a request by my friend Ana, which unfortunately took me weeks to get around to. I started to make ciabatta a week or two ago but I forgot I had plans that day and had to leave the dough to rise an extra several hours, which turned into very flat, ugly, but tasty bread. This time it worked, because I followed the directions, and it was well worth trying again.
You can form the dough into small loaves for making sandwiches out of, or make one big loaf and enjoy it by the slice. Either way, this is a flavorful bread that won't disappoint.

Be warned! You have to start the dough a full day in advance, and of course it has to rise for a few hours before you bake it, so start this bread about 28-29 hours before you want to actually eat it. For example, if you want to serve it with dinner, make the starter the minute you get home from work and it should be ready when you're done cooking dinner the next day.

It's heavenly fresh out of the oven dipped in olive oil and balsamic vinegar with just a pinch of salt and black pepper, but I've got half a loaf in a baggie in my purse I've been snacking on all day. Bread is so good.

Ciabatta
Makes 4 small loaves

Starter:
1/8 tsp yeast
2 tbsp warm water
1/3 cup room temperature water
1 cup all purpose or bread flour

Combine the yeast and warm water in a medium bowl and let stand til foamy, about 5 minutes. Add the room temperature water and flour, mix well with a pastry cutter for 4 minutes or so. Cover with plastic wrap and let stand a full 24 hours before proceeding.

Dough:
1/2 tsp yeast
2 tbsp warm whole milk
2/3 cup room temperature water
1 tbsp olive oil
2 cups all purpose or bread flour
1 1/2 tsp salt

Stir yeast into the warm milk and let sit for 5 minutes until foamy. (Sound familiar?) In a large bowl, mix the starter, warm milk mixture, and remaining ingredients with a pastry cutter until a dough forms, then knead for at least 5 minutes. Lightly oil the inside of your big bowl and place the dough back in it. Cover with plastic wrap and let rise until doubled, about 1 1/2 to 2 hours.

Cut two pieces of parchment paper to fit two cookie sheets. Divide and shape the dough into four rectangles about 8" long, two per cookie sheet. Lay them on the parchment paper and add a dusting of flour to the tops. Poke dimples in it with your fingers to give it that nice texture we love so much. Cover with a damp towel and let rise another hour.
15 minutes into the rising, start preheating the oven to 425º.

Bake the loaves one pan at a time in the middle of the oven for about 20 minutes or until golden.
This bread, like any, will go stale quickly if not stored in plastic bags.

Spicy South American Chicken

I made this the other night to accompany the banana rum tart I made. I made it up as I went, and it was really yummy so I was pretty pleased that I'd taken the time to write things down as I threw them in. This recipe is thankfully fast to make, it should take about as much time as the rice takes to cook. I love when things work out that way!

Spicy Peruvian Chicken


2 chicken legs, 2 chicken thighs on the bone
1/3 stick butter
4 tbsp olive oil
1 small onion, chopped
5 cloves garlic, chopped
3 tbsp lemon juice
1/3 cup cooking sherry
1 tbsp adobo
1/2 to 1 tsp cayenne pepper
1 tsp chili powder
2 tsp cumin
1/2 tsp paprika

Mix the adobo, cayenne, chili powder, paprika, and cumin in a small bowl. Set aside.
In a large skillet over medium-high heat, melt the butter and olive oil until bubbly. Add the chopped onions and garlic and sautée until onions are softened and clear. Pour the lemon juice and sherry into the middle of the pan, stir, and shove the onions to the edge of the pan. Add the chicken and sprinkle half of the seasoning mix on it. Cover for about 5 minutes, then turn the chicken pieces over and sprinkle the rest of the seasoning on them. Turn the heat down to medium. Cover and let cook, flipping the pieces as you see fit, until the chicken is golden brown and cooked through.
Serve with red beans and rice and plantains if you've got 'em.

Monday, February 16, 2009

Banana Rum Tart with Chocolate Mousse


I had some bananas getting spotty on my kitchen shelf, and wanted to come up with some way of using them other than my standard banana bread. This is what I came up with, after reading a dozen recipes for banana custard and banana cream and a Cuban banana rum cake. I served it after red beans and rice with spicy chicken, and I will likely post that recipe very soon.

This recipe makes enough banana custard to fill one full size pie shell and three 4-inch mini tart shells.

Banana Rum Tart & Chocolate Mousse

Tart Shell
1 cup all purpose flour
1 tsp salt
1/3 cup butter
3 to 4 tbsp ice water

Whisk together the flour and salt in a medium bowl. Cut in the butter and mix with a pastry cutter until it looks like coarse crumbs. Add 3 tbsp ice water and mix until the dough is smooth. If too dry, mix in another tablespoon of ice water.
Roll the dough out between two pieces of parchment paper to a circle slightly larger than your pan and refrigerate for 30 minutes before removing the parchment and fitting it into the pie pan. Bake for 8 minutes at 425º before filling with banana custard.

Banana Rum Custard Pie Filling
3 overripe bananas
3 eggs
1/3 cup brown sugar
2 tbsp all purpose flour
3/4 cup heavy cream
4 tbsp dark rum
1 tbsp all purpose flour
2 tbsp confectioners' sugar

In a large bowl, mix the bananas, eggs, and brown sugar on medium until smooth and bubbly. Add the cream and rum, mix in. Pour into the partially baked crust and bake in a 350º oven for about 20 minutes, or until the custard is set.

Chocolate Mousse
1/2 cup milk
6 tablespoons sugar
1 large egg yolk
1 cup chocolate chips or 4 bars of baking chocolate
Pinch of salt
2 tablespoons unsalted butter, softened
1/2 cup heavy cream
2 tsp ground cinnamon

In a small saucepan, melt the chocolate over low heat, stirring often. Set aside. In another sauce pan, combine the other half of the milk and sugar and heat until steaming and the sugar is dissolved. Put the egg yolk in a small bowl and gradually whisk in the hot milk. Return the mixture to the saucepan and cook over moderate heat, whisking constantly for about two minutes until it has thickened slightly.
Remove the pan from heat. Add the chocolate and salt and whisk until smooth. Whisk in the butter. Pour the mousse into a plastic bowl and freeze for 15-30 minutes, then whip with a hand mixer on high speed until the mousse is thick and fluffy.
Place a heaping tablespoon of mousse on each serving of banana rum tart. Top with an anise star, or chocolate shavings.

Sunday, February 15, 2009

Pecan Waffles with Honey Butter

If you don't have a waffle iron, it's time to buy one. Waffles are so quick, easy, and versatile, your weekends will be forever changed for the better. You substitute the chopped pecans for chocolate chips, blueberries, chopped ham or bacon, or any number of other things. They're also good plain with just the standard butter and syrup, or berries and cream, whatever floats your boat.

Pecan Waffles

makes 5 waffles, 20 minutes start to finish

1 1/4 cup all purpose flour
1/2 tsp salt
2 tsp baking powder
1 tbsp brown sugar
1/2 cup chopped pecans
1 egg, beaten
1 1/4 cup milk
1 tbsp lemon juice
1/3 cup vegetable oil

Preheat your waffle iron.
In a measuring cup, add the lemon juice to the milk and set aside.
In a medium bowl, sift together flour, salt, baking powder, brown sugar, and chopped pecans.
Add the egg and oil to the milk, then pour into the dry ingredients and stir until combined.
Pour 1/3 cup of batter on the center of the waffle iron, close it and bake until golden brown. Serve with honey butter sauce:

Honey Butter Sauce

2 tbsp butter
2 tbsp honey
1/2 tsp cinnamon
1/4 tsp nutmeg

Melt butter in the microwave, add the honey and spices and stir (preferably with a tiny whisk) for about 2 minutes until they are well combined.

Saturday, February 14, 2009

Peanut Butter And Jelly Cupcakes


My friend Eryn asked for peanut butter and jelly cake for her birthday, but she is in New York and I am in Chicago so the best I could do was bake PB&J cupcakes and send her pictures. I took these to a potluck last and they got pretty good reviews.

This recipe is from Tyler Florence on the Food network website, a lot of the reviews were 5-star but a few people there said their cupcakes came out awfully, so I was a bit hesitant to bake them for a party. I didn't bake them as instructed, but instead added the milk and flour alternating 1/3 of each at a time (which is what most cake recipes instruct you to do), and so I have given you my version below instead of the original instructions. I bet they lead to really dry, dense cake. The cake itself is probably the most basic cake I have ever eaten. It's somewhere between sponge cake and yellow cake. It's the cupcake version of white bread, for sure, and perfect for the PB&J sandwich effect.

I wonder what would happen if the jelly were put by teaspoonfuls into the cupcakes themselves before baking... If anyone wants to try that, let me know how it works out. You can use any flavor of jelly, but be sure not to use anything with big chunks in it or you won't be able to squeeze it into the cupcakes.

Peanut Butter & Jelly Cupcakes

White Bread Cupcakes
3 cups all purpose flour
2 tsp baking powder
1 tsp salt
1 cup butter, at room temperature
2 cups sugar
4 large eggs plus 2 yolks
4 tsp vanilla extract
1 1/2 cups milk
1 1/2 to 2 cups grape jelly

Preheat the oven to 350º. Line a cupcake pan with cups and spray them with nonstick spray. Put at least half a jar of grape jelly into an icing bag with the widest-holed tip you have, set aside.

In a medium bowl, whisk together the flour, baking powder, and salt. Set aside. In a large bowl, cream the butter and sugar with a hand mixer on medium speed until light and fluffy. Beat in the eggs, yolks, and vanilla. Reduce the speed to low and scrape down the sides of the bowl. Pour in 1/3 of the milk and beat in, then beat in 1/3 of the flour. Repeat with remaining milk and flour, then spoon into cupcake cups. Cups should be about 2/3 to 3/4 full.

Bake until the cupcakes have grown domes and are lightly golden around the edges, and a toothpick inserted in the center comes out clean. Let cool in the pan for 15 minutes, then remove to cooling racks. While they're baking and cooling, make the icing and chop your peanuts.

When the cupcakes are completely cool, insert a butter knife 1" deep into the middle and twist. Insert the icing tip of the grape jelly icing bag into the hole and squeeze out about 1 tsp worth. Cover with icing and sprinkle with chopped peanuts.

Peanut Butter Icing:
1/2 cup butter at room temperature
1 cup creamy peanut butter
1 8-oz bar of cream cheese, at room temperature
pinch of salt
1/2 tsp vanilla
1 tbsp milk

In a medium bowl, cream the butter, peanut butter, cream cheese, salt and vanilla until very smooth and light. Mix in the confectioners' sugar half at a time, and add milk. Continue to beat for a few minutes to get it nice and whipped and fluffy.

Wednesday, February 11, 2009

Blueberry Scones


This morning, Chicago was doing its best London impression, and there's nothing to warm you up after a walk in the cold rain like a scone and some tea. These are so fast and easy to make, you'll probably find yourself making them all the time once you've tried it.

If you don't have buttermilk handy (who keeps that around?), you can put a few teaspoons of lemon juice or vinegar in the milk and let it sit for a few minutes and it'll work the same as buttermilk. I'm sure you can find a precise ratio of vinegar to milk online, I just pour a little and have never measured. Now you know my lazy secret.

Blueberry Scones

3/4 cups all-purpose flour
1/4 cup brown sugar
4 tsp baking powder
1/4 tsp baking soda
1/3 cup cold butter
1 3/4 cups buttermilk
1 1/2 cups fresh blueberries
1/3 cup granulated sugar

Preheat the oven to 375º.
In a large bowl, whisk together the flour, brown sugar, baking powder, and baking soda. Cut the butter into small pieces and mix with a pastry cutter (or your hands for messy fun) until it looks like coarse crumbs. Stir in the buttermilk until just combined, and add the blueberries.
Knead just enough to evenly distribute the blueberries and place on a greased cookie sheet. Spread the dough out to a rough rectangle, about 1 1/2" thick and sprinkle granulated sugar all over the top. If you have coarse sugar, use that.
Bake for 30 to 35 minutes or until slightly browned.

Tuesday, February 10, 2009

Oatmeal Raisin Cookies with Currants

Oatmeal cookies are so satisfying. When you think about all the oats and raisins it's almost easy to convince yourself they're healthier than other cookies, but who do you think you're kidding? I guess the oats probably do count, but there's just no such thing as a healthy cookie. Oh well!

You can use 1 cup of raisins instead of half raisins half currants, or switch them out for nuts or chocolate chips or toffee chips. Toffee chip oatmeal cookies are heavenly!

Oatmeal Raisin/Currant Cookies


3/4 cup all purpose flour
1/2 tsp baking soda
3/4 tsp salt
1 tsp ground cinnamon
3/4 cup (1.5 sticks) butter, at room temperature
1 cup light brown sugar
1 large egg
1 tsp vanilla
1 tsp honey (optional)
3 cups rolled oats (not instant)
1/2 cup raisins
1/2 cup dried currants

Preheat the oven to 350º. In a medium bowl, whisk together the flour, baking soda, salt, and cinnamon. Set aside.
In a large bowl and using a hand mixer, cream the butter until smooth. Add the egg, vanilla, and honey and beat to combine. Now add the flour mixture and beat until incorporated, then stir in the oats and raisins/currants/nuts/chocolate.

Use a tablespoon to scoop up portions of batter. Roll them into a ball in your hands before placing 2" apart on a cookie sheet. Press each cookie with the palm of your hand before baking, they should be about 1/2" thick, or a little thicker.
Bake for about 12 minutes or until browned around the edges. Let cool completely before removing from pans, or they will crumble beyond repair. If you do happen to destroy any while trying to get them off the cookie sheet, you can save them in a plastic bag in the freezer and use them as yogurt or ice cream topping. I always crumble a few.

Sunday, February 8, 2009

Home Fries

Home fries are a Sunday brunch favorite at my house. Perhaps it's because they're savory and filling and heavy enough to satisfy the serious hunger of such late breakfasting, or perhaps it's because they do such a good job of stamping out symptoms of a hangover (paired with coffee, of course). It always feels like this dish is taking forever while I'm making, but it's really only about 30 minutes from prep to finish. I blame the aforementioned hangover.

If you happen to be making bacon for the same meal, you can make that in the same pan before you start the potatoes and they'll be extra crispy and flavorful, though certainly less healthy. Of course, I'm not the kind of girl who lets a thing like that get in the way of a perfectly delicious breakfast.

Home Fries
serves 3 to 4, prep time 30 mins


1/2 of a small onion, chopped or diced
1 tbsp butter
1 to 2 tbsp olive oil
3 potatoes, cut into roughly-1/2" chunks
1/3 cup water
2 tsp chili powder
1 tsp mustard powder (optional but yummy!)
1 tsp garlic powder
1/2 tsp seasoned salt
salt to taste
fresh ground black pepper to taste

In a skillet over medium-high heat, melt the butter and olive oil and throw in the onions. Sautée for a few minutes, stirring occasionally, until the onions are soft and clear. While the onions are cooking, microwave the potatoes on a plate for 1 1/2 to 2 minutes. Add the potatoes, water and seasoning to the skillet, stirring well to evenly coat the potatoes in spices.
Continue to stir the potatoes occasionally as you sautée another several minutes until the potatoes are brown and crispy, adding a little oil along the way if the mix looks too dry.

Friday, February 6, 2009

Crustless Apple Pie

I've made a lot of different kinds of apple pie over the past few years, and this one is by far the fastest, easiest and tastiest. It's a shame it's not more elegant, but I always get over its less-than-beautiful appearance the minute people start eating it and the chorus of "mmmmm!" begins. At least two friends have told me that they love this though they hate apple pie in general, so there must be something to it. It's like a bed of sweetened apples with a snickerdoodle on top. Can't beat that!

The recipe is from the grandmother of an old friend of mine. I have since received this exact recipe from two other people, and all three originated in western Massachusetts. If anyone knows why every western-Mass grandma has the same apple pie recipe, please let me know.

Tip: If you don't let the butter cool after melting, your pie will be dripping with butter in a bad way. Yes, there is a bad way.

Crustless Apple Pie

prep time about 15 minutes, bake time 45 minutes.

5 or 6 apples, cut into wedges about 1/4" thick
1 tbsp cinnamon
1 tbsp sugar
1 cup flour
1 cup sugar
3/4 cup butter, melted and cooled
pinch of salt

Preheat oven to 350º.
Lay the sliced apples in the pie pan - it should be about 2/3 to 3/4 full. Sprinkle the tablespoons of cinnamon and sugar on top.
In a small mixing bowl, mix the flour, sugar, butter, and salt. Pour onto the center of apples, it should spread itself out. Help it with a fork, if it's not spreading well enough to suit you.

Bake for 45 minutes or until lightly browned.

Wednesday, February 4, 2009

Cable-Knit Pie Crust


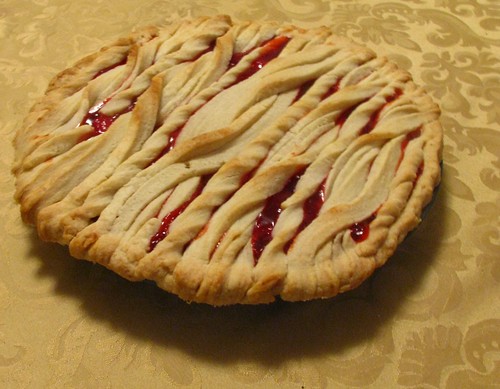
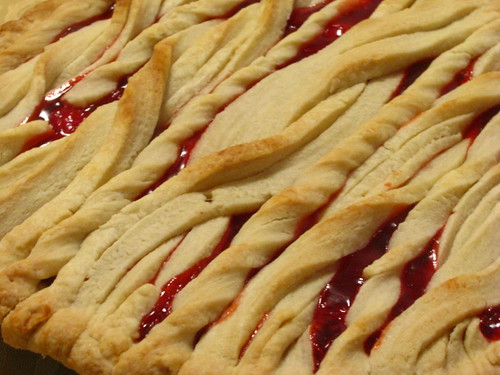
Ok, so I have to admit that I cheat once in a while. I was really craving cherries, which are prohibitively expensive in the off season, and bought a can of cherry pie filling. I was totally dissatisfied with the inside of the pie as a result, but the crust was yummy and definitely easier to work with than other pie dough recipes I've tried. It's also the prettiest pie I've made yet, so despite its not-from-scratch filling, I am showing it off.

The recipe is adapted from Baking Illustrated from America's Test Kitchen. The design idea for the top came from a conversation I had with one of my friends, a fellow sweater designer, just before making it. It helped that I was making it for a craft night I was hosting, so I knew the people eating it would appreciate the idea. I know the top looks really complicated, but it's not actually that hard. I'll give the best directions I can.


Two-Layer Pie Crust

3 cups all purpose flour
1 tsp salt
2 tbsp sugar
2 sticks + 1 tbsp butter, cut into small chunks
10 tbsp ice water

Whisk the flour, salt, and sugar in a medium mixing bowl. Add the butter a bit at a time and mix with a pastry cutter until it looks like fine crumbs, with pieces no bigger than peas. Sprinkle the ice water over the crumbs and mix by pressing down with a rubber spatula. You can add an extra tablespoon or two of ice water if it won't come together.
Divide the dough in half. Form into 5" disks and wrap with plastic wrap. Refrigerate at least one hour.

After the dough has had time to chill, Preheat the oven to 375º. Take one piece of dough out and place between two sheets of parchment paper. With a rolling pin, roll it out to a 12" circle, then carefully roll it around the rolling pin. Hold the rolling pin just above the pan and carefully unroll the dough into place. Press down lightly to fit the dough into the pan, then cut excess off edges. Prick the bottom of the crust to reduce risk of bubbles when it bakes.

Fill the pie with whatever you're putting in it. Canned pie fillings aren't terrible, but: if you cut up 5 apples and sprinkle a few tablespoons of cinnamon and sugar over them you won't be disappointed and it's as easy as opening up cans.

Take the other piece of dough out of the fridge and roll it out to 12" too. Using a very sharp knife, cut 4 lines diagonally across the widest part of the dough. The lines should be about 1/4" apart. These three pieces will be the 'cable' down the center of the pie. Pick the 3 pieces up carefully with both hands and lay one end on the edge of the crust, pinching it down slightly. Drape them across the middle of the pie, flipping them over every 2" or so. That creates the 'cable' look. When you get to the other end, pinch it down again. You'll cut off the excess later.

Repeat the 3-strip lay-and-flip process two more times, so that there are 3 cables evenly distributed across the pie. To fill in the rest, cut a few more 1/4 strips and twist each one, creating a spiral. Lay these down in any areas that look too open. Repeat until the pie is visually balanced and pinch down the edges around the crust one more time, then cut off excess carefully with a knife. Bake for 25-30 minutes or until lightly browned around the edges.

Let cool mostly before serving.

Whitefish in Ginger Sauce with Spinach

I may or may not have mentioned that my boyfriend Richard cooks, too. Having learned to cook while living in Japan for a couple of years, the food he makes tends to be Asian, or at least Asian-inspired. Also it's generally really good. Vegetables cooked just beautifully, with flavorful but light (as in, non-greasy) sauces and a nice balance of meat or fish, tofu, vegetables, and of course rice. I'm always surprised by the seemingly effortless marriage of savory and sweet in most of these dishes, and am pleased to have the opportunity to share one with you. I got him to write it down for me before he forgot, for this was certainly an on-the-spot creation for dinner the other night. I liked it so much I seriously considered making it for myself the next day. It was inspired by a handful of Vietnamese recipes he'd been reading, if I recall correctly.

If you don't have these sauces on hand, know that they're only $3 or $4 a bottle and are available in most grocery stores, and they're really nice to have on hand for the sake of variety. The marinades you can whip up with sriracha hot sauce, nam pla fish sauce, sesame oil, mirin, rice wine, etc, are always, always delicious, in my experience. Lucky for me, we've developed quite a collection. Note that the fish sauce smells funky if you're not used to it, but I promise it tastes good. Have faith in me, k? I won't feed you anything nasty. I'm too picky an eater for that.
Sriracha is known as "cock sauce" among some friends of ours, due to the crowing rooster on the bottle. It's way more fun than saying "sriracha." Try it.

He also made green beans sauteed in a sweet sauce with crushed sesame seeds, but the recipe is written in Japanese so unfortunately I can't share it with you until he has time to translate it for me. Doh!

Whitefish in Ginger Sauce

1 large fillet of whitefish or tilapia
3 tbsp fish sauce
1 tbsp soy sauce
1 tbsp sriracha
1/2 tsp lemon juice
1 tbsp freshly ground ginger, not powder
2 shallots, minced
1 to 2 tbsp vegetable oil
1/3 cup water
about half a bundle of fresh spinach, stems removed


In a large bowl, whisk together the fish sauce, soy sauce, sriracha, lemon juice, and ginger. Place the fish fillet scales-up in the marinade and set aside.
In a skillet over high heat, sautee the shallots in the oil, stirring occasionally, until the shallots are soft. Shove them aside with your spatula to clear the center, leaving some oil. Place the fish scales-up in the middle of the pan and sear it for a minute or two. Set the marinade aside and stir the shallots a bit so they don't burn. Flip the fish over, add the marinade and 1/3 cup water and stir with the spatula. Shove the shallots closer to the fish and lay the spinach in the skillet on top of everything.
When the spinach is shriveled and soft, and the fish is opaque, remove from heat and serve with rice, drizzling the remaining marinade over the fillet.

This fish goes very well with some sake.

Tuesday, February 3, 2009

Extra Nutty Brownies


Brownies come in all kinds, from cakey to fudgy and everywhere in between. Generally I prefer really fudgy brownies, practically fudge with a little flour thrown in. These are not that. I'll post a fudgy brownie recipe soon. In the meantime, these are still really good, I mean, how can you go wrong with brownies? These are moist and chewy but cakey around the edges, full of pecans and walnuts with a richness that begs for milk, with just a little extra vanilla and salt in the mix to really bring out the flavor of the nuts. You can add more nuts, like macadamias or almonds, or trade them all out for peanuts for a different flavor experience altogether.


Extra Nutty Brownies
Prep time 10 minutes, Baking 30 minutes.

4 1-oz squares unsweetened baking chocolate
1 cup granulated sugar
1/3 cup butter
2 tbsps strong coffee
2 large eggs
2 tsp vanilla extract
3/4 cup all purpose flour
1/2 tsp salt
1/3 cup pecans
1/3 cup walnuts

Preheat oven to 325º. Grease an 8" square baking pan with butter or cooking spray.
In a small sauce pan on low heat, slowly melt the butter, sugar, and chocolate, stirring constantly with a rubber spatula (preferably a heat-proof one). Pour into a medium bowl and stir in the eggs one at a time, then the vanilla. Add the flour and salt, stirring well, then add the nuts and stir them in. Pour into the pan and bake for 30-35 minutes. Cut into squares once they're cooled for cleanest edges. If clean edges don't matter to you, dig in as soon as the steam stops.

Monday, February 2, 2009

Jam Sandwich Cookies

These cookies take a while, so definitely save them for the weekend. They're light and buttery and not too sweet, and can be changed easily to suit any occasion (hearts for Valentine's Day, for example). You start with a simple butter cookie, but once you've added jam and powdered sugar they certainly don't taste simple.

A few tricks:
1) To get the inner cookie out easily, pinch your cookie cutter a little and lift.
2) Use a spatula to gently transfer these from the parchment to the cookie sheet, they're delicate and will break if you just pick them up with your hands.
3) Wear an apron for these, they're pretty messy.
4) Make sure your tiny cookie cutter leaves plenty of cookie around it, the thinner the edges are the more likely the cookies are to break. Any bigger than the star I used would be a bad idea. Hearts should be placed with the point at least 1/4" from the edge.

Jam Sandwich Cookies
1 cup butter
1 cup white sugar
1 egg
2 2/3 cups all-purpose flour
1/4 teaspoon salt
2 teaspoons vanilla extract
1 small jar raspberry jam
1/2 cup (or more) confectioners' sugar for dusting

In a small mixing bowl, whisk together the flour and salt, set aside.
In a large bowl, cream together the butter and white sugar with a whisk or hand mixer until light and fluffy. Beat in the egg, then stir in the vanilla. Stir the flour mixture into the sugar mixture.

Divide the dough in half and lay each half on a piece of parchment paper. Roll out each half of the dough between two pieces of parchment paper. The dough should be between 1/8" and 1/4" thick. Lay the parchment-rolled dough slabs on a cookie sheet for stability and put in the fridge for at least one hour.
Cut with round cookie cutters. Cut a shape out of the center of half of the cookies, the solid half will be the bottoms. You can either bake the cutouts as extras or re-roll them and make additional sandwiches out of the dough.
Preheat oven to 400º for at least 20 minutes. Bake for 8 to 10 minutes or until *very* lightly golden at the edges. Remove from cookie sheets to cool on wire racks.

When the cookies have nearly cooled, melt your jam in a sauce pot over medium-low heat. Put 1 teaspoon of melty jam on each cookie bottom. Dip the top of each cookie top in powdered sugar then press it into place. Let the cookies set for 30 minutes before stacking or serving them, otherwise the jam will set crookedly and ruin all your hard work.

Not that they're that hard. Just time consuming and delicious.

Sunday, February 1, 2009

Chocolate Peppermint Cake

Ok, so this isn't the prettiest cake I've ever made, but the peppermint buttercream really needs to be refrigerated for an hour before trying to ice the cake, and the cake must be completely cool before you ice it. Otherwise your buttercream will do what mine did - sank right in. A last-minute addition of a whole batch of a completely different icing saved the day. Learn from my mistake! Chill! Or you'll have to take an extra hour to redo the icing, and it will not be fun, not at all.

I like to give birthday cakes as birthday presents. I generally ask my friends a week or so before their birthdays what they'd like, and I make whatever they ask for. I've made a 3-tier
neon-flecked cake, mango cheesecake, twin pies of chocolate mousse and key lime (served as two slivers, like TwoFace made cream pies), and last year I made two black forest cakes in the same week for two different birthdays. I think the best part of this setup is that I get fairly frequent challenges, and I put my best into them because, hey, they're my birthday gifts!

In the case of this particular cake, my friend Allie (ain't she cute?) said three words. Chocolate, peppermint, pattie. This is what I came up with. Unfortunately for you, it went over so well that it was eaten before I could get my camera and show you how soft and dark and rich the cake is inside. Please take my word for it, or better yet, prove it by baking this cake for yourself, it's intensely good. The recipe is derived from the back of the Hershey's Cocoa Powder container, but I traded out some of the cocoa for some dark chocolate and used butter instead of vegetable oil, changing the amount to account for the extra moisture in butter, and used strong coffee instead of water. I mean, come on Hershey's! Water? Really? Sheesh.
The peppermint icing recipe is borrowed from a Daring Bakers post, and it is heavenly.

Chocolate Cake
1 3/4 cups all purpose flour
2 cups sugar
2/3 cup cocoa powder
1 1/2 tsp baking powder
1 1/2 tsp baking soda
1 tsp salt
6 tbsp butter
2 1-oz squares unsweetened baking chocolate
2 eggs
2 tsp vanilla extract
1 cup boiling strong coffee

In a sauce pot on medium heat, melt the baking chocolate and butter, stirring often. If it starts to bubble, turn down the heat or it'll burn. Set aside and let cool.
Heat oven to 350º and grease two 9" round cake pans.
In a large bowl, whisk together the flour, sugar, cocoa powder, baking powder, baking soda, and salt. Add eggs, milk, buttery chocolate, and vanilla and beat with a hand mixer on medium for about 2 minutes. Scrape the sides of the bowl with a spatula, add the boiling coffee and stir it in. Pour into cake pans and bake for 30-35 minutes or until a toothpick inserted in the middle comes out clean. Let cool 10 minutes before removing from the pans and letting cool completely on wire racks.

Peppermint Buttercream Icing

1 cup granulated sugar
1/4 cup water
1 large egg
1 large egg yolk
14 tbsps unsalted butter, at room temperature cut into chunks (1 3/4 sticks)
8 drops of peppermint oil or 3 teaspoons of peppermint extract. Very different strengths!

Combine the sugar, and water in a small saucepan and warm over medium heat without stirring, until the syrup reaches 250 degrees F on a candy or instant-read thermometer then remove from heat.

While the syrup is heating, begin whisking the egg and egg yolk at high speed in the bowl of your mixer using the whisk attachment until pale and foamy.

When the sugar syrup reaches the correct temperature, reduce the mixer speed to low and begin slowly (very slowly) pouring the syrup down the side of the bowl being very careful not to splatter the syrup into the path of the whisk attachment. Some of the syrup will spin onto the sides of the bowl but don’t worry about this and don’t try to stir it into the mixture as it will harden!

Raise the speed to medium-high and continue beating until the eggs are thick and satiny and the mixture is cool to the touch (about 5 minutes or so).

With the mixer on medium speed, begin adding in a few chunks of butter at a time. When all the butter has been incorporated, raise the mixer speed to high and beat until the butter cream is thick and shiny. Finish with about 8 drops of the peppermint oil.

Refrigerate the butter cream until it’s firm but still spreadable. Put it back on the mixer and whisk until fluffy.

--------------------------------
Now, here's where MY cake went wrong. The icing was absorbed by the cake because I didn't wait for the involved parties to be the right temperatures, so here's the chocolate icing I made to cover up the bad job. It was delicious and worked like a charm. I may do the double-icing thing on purpose next time, cause it was really good with both.

Chocolate Icing
1/2 cup butter
2 cups powdered sugar
1 tbsp. vanilla extract
2 tbsp milk
1/4 cup cocoa powder
dash of salt
1 tsp peppermint extract (optional but recommended)

Melt butter or bring it to room temperature. Add powdered sugar, salt, vanilla, chocolate and milk. Whip with a whisk or an electric mixer until smooth. Refrigerate at least 30 minutes before icing your cake.